“Hello World.” That's what you'll be seeing soon from your Kubernetes cluster if you follow this tutorial! 💬 — Or, alternatively, an empty “SayHello” request and response via gRPC… a modern and preferable alternative to RESTful APIs. (with JSON, etc.)
Why not Google App Engine… or Cloud Functions?
I'm a big fan of Google App Engine (GAE) due to its “serverless” infrastructure and its ability to autoscale at a moment's notice to support huge surges of traffic… and, at a reasonable cost.
GAE even has built-in autoscaling Memcached and Datastore, and supports Let's Encrypt for no-cost, auto-renewing HTTPS/TLS support, as well. I've launched well-designed applications to huge sudden traffic spikes from sites like Hacker News and Product Hunt without issue, and Snapchat even used GAE to scale its way to an IPO. 📈 — But, it doesn't support HTTP/2 through to the application at this time of writing! 😞 GAE is unfortunately a bit dated at this point, and based on its design it's unclear whether it will ever fully support HTTP/2.
By nature, HTTP/2 offers bidirectional flow of data, yet the load balancer on GAE converts all HTTP/2 traffic to unidirectional HTTP/1.1 requests. Although HTTP/1.x still dominates traditional web traffic today, modern apps and browsers are quickly adopting HTTP/2. — Also unfortunate is that Cloud Functions, a potential successor to GAE, shares a lot of GAE's underlying infrastructure currently, and therefore also does not fully support HTTP/2. — So, for this project, we're “rolling our own” solution instead! 🤷🏼♂️
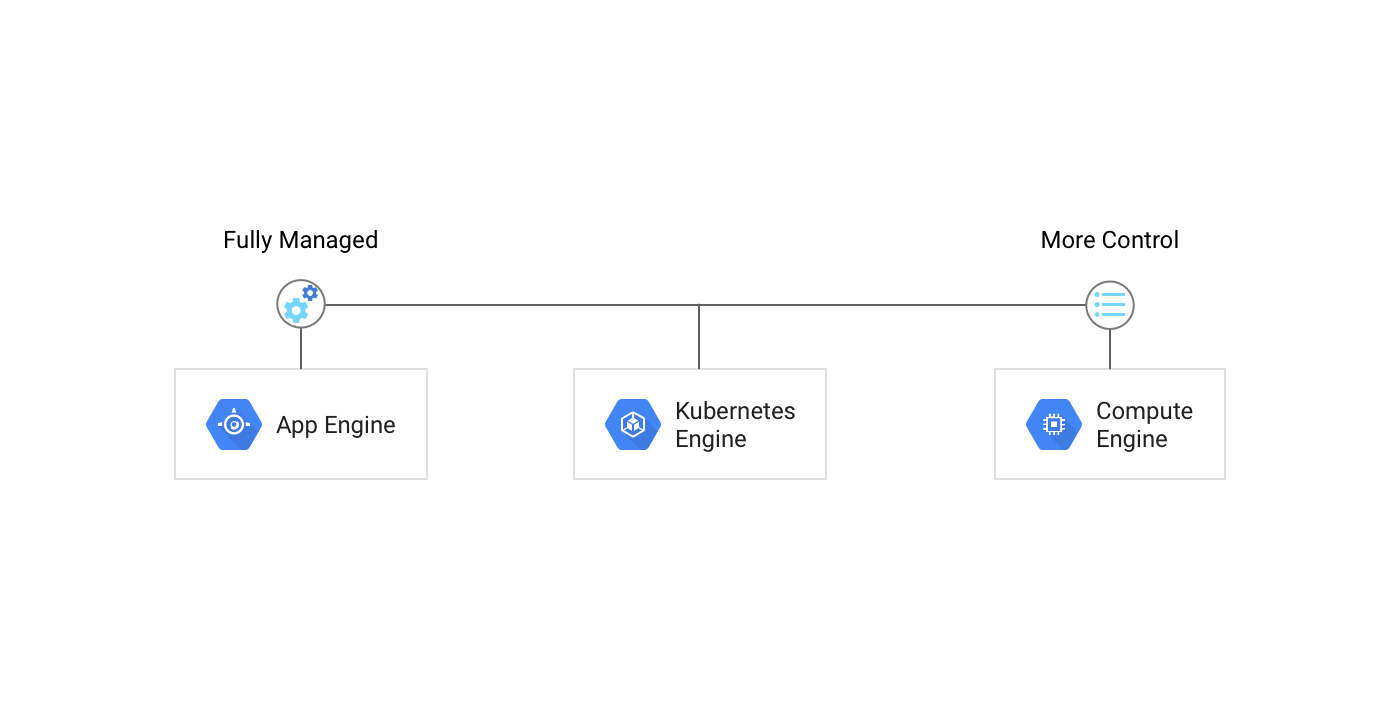
A well-configured Kubernetes setup can autoscale, although it has a higher upfront monthly cost and is less simple to configure and deploy. — If you go this route, hopefully this “quickstart” can help save you some time!
The codebase I'm providing to help you
There's some scaffolding you'll need to get started. I've created a repository on GitHub that includes:
- A gRPC server, and a separate plain HTTP/2 server for a “health check.” (If you only want HTTP/2 not gRPC, just remove the gRPC dependencies and protos, and promote the health check server from its Go routine to replace the gRPC server that runs primarily!) 👍🏻
- Code that generates self-signed certificates (for internal use) based on the node's IP address on launch. — Ingress will provide the client-facing TLS with a different certificate!
- A template “proto” and “service” for gRPC, with an empty request and response. (For testing and verification from a client, but can be discarded if you're not using gRPC.)
- Template deployable manifest files for the necessary additional configuration of Ingress on Google Cloud Platform. (For traffic and load balancing.)
… This will save you some steps and trouble. 😉
You'll need to edit each file to adjust your project name, prefix, and probably write some scripts to help you deploy more conveniently than running commands manually each time, but by the end of the quickstart, you'll hopefully have something running that you can iterate on. 📝
Please feel free to provide comments or feedback below or to me directly that might help others, and I'll update this post accordingly if necessary!
Let's deploy Kubernetes!
First of all, clone the code repository to your local `GOPATH` as a starting point: https://github.com/benguild/gke-grpc-example (… I'm assuming that you have a local Golang environment setup already on your computer!) 😅
Then, create a project on Google Cloud Console if you don't have one already to work with.
Create a Kubernetes cluster
For this step, visit the “Clusters” tab of Kubernetes Engine on Google Cloud Console, and tap the “Create cluster” button. — You can also do this from the command-line if you want.
There are a lot of settings you can customize here, but since this is a “quickstart” and you'll probably need to customize these later for your application based on its specific needs, I'm going to suggest just the minimum specs here:
- Choose the name “example-grpc” for your cluster to ease deployment. (Once you're beyond the “Hello World” stage, you can refine the configuration and replace the cluster on your own.)
- Be sure to choose at least version “1.10.7-gke.6” or later. (This will not work on older versions, as they do not support the “HTTP2” tag used in our configuration.)
- If you choose a zone aside from the default “us-central1-a” zone, you'll need to update your configuration and commands below to that zone instead, so please keep this in mind.
- Ensure that the “Enable HTTP load balancing” option is checked.
- If you tap the “Advanced Edit” button for your “Node pool” that's created by default, you can tweak the settings there based on what I've outlined in the screenshot below. (To minimize costs to start, choose the “small” size for “Machine type” unless you're sure that your needs will exceed this right away!) 💸
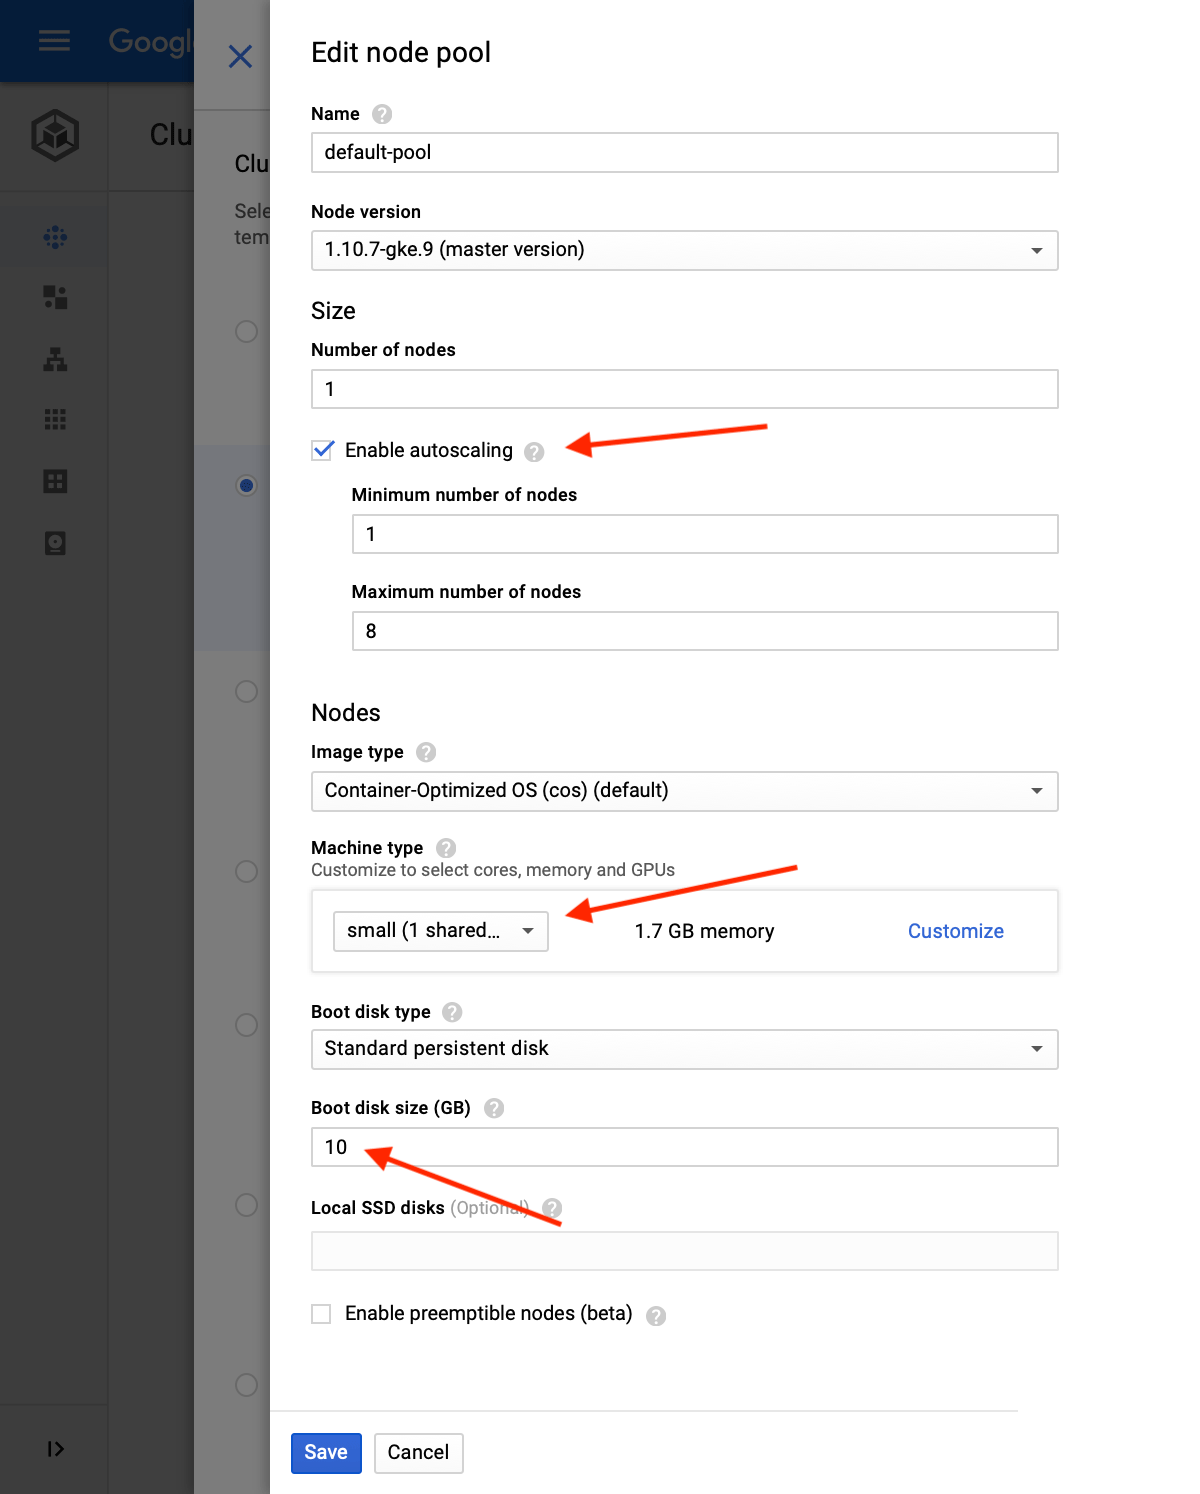
- The other settings can be configured based on your needs. (You should review and adjust them accordingly as necessary. Some of them cannot be adjusted again later without deleting and recreating your cluster and/or its node pools, so keep this in mind.) ⚠️
… Once your cluster is running, you'll be able to deploy a Docker image to it below! ✨
Deploy the Docker image
OK, so at this point you need: ☑️
- Permission to modify a running Kubernetes cluster. (as configured above)
- The repository of code and a local Golang (Go) environment.
- Both Docker and the Google Cloud SDK both installed locally on your machine.
… If you're all set, it's time to jump into the terminal to build and deploy the docker image templated out in the repository to the Google Container Registry for use by your Kubernetes cluster. — I've used the project name twice here, so replace “example-grpc” with your project name:
docker build -t gcr.io/example-grpc/example-grpc:demo .
docker push gcr.io/example-grpc/example-grpc:demo
… Then, let's run the image on the cluster:
gcloud components install kubectl

gcloud auth configure-docker
gcloud container clusters get-credentials example-grpc --zone us-central1-a --project=example-grpc

# Format: gke_{project}_{zone}_{cluster}
kubectl config use-context gke_example-grpc_us-central1-a_example-grpc
kubectl run example-grpc --image=gcr.io/example-grpc/example-grpc:demo
kubectl get pods
… Once that's done, you should have the image running on the cluster after a few minutes. You can monitor the status of it on the “Clusters” tab of Kubernetes Engine on Google Cloud Console, or via the command-line.
Redeploying a new image to the cluster later
If you need to replace and redeploy the image again later, just rebuild and push the image with a version name other than the original “demo” label, and then run:
kubectl set image deployment/example-grpc example-grpc=gcr.io/example-grpc/example-grpc:demo2… That's it. ✅
Configuring the Workload
Once your cluster is running and the image is deployed, let's proceed to configure the “workload” that has been created. — First, we'll be in the terminal, then back in Cloud Console for simplicity.
Configure autoscaling
On the page for your workload, in the “Actions” menu at the top, there's an “Autoscale” configuration option:
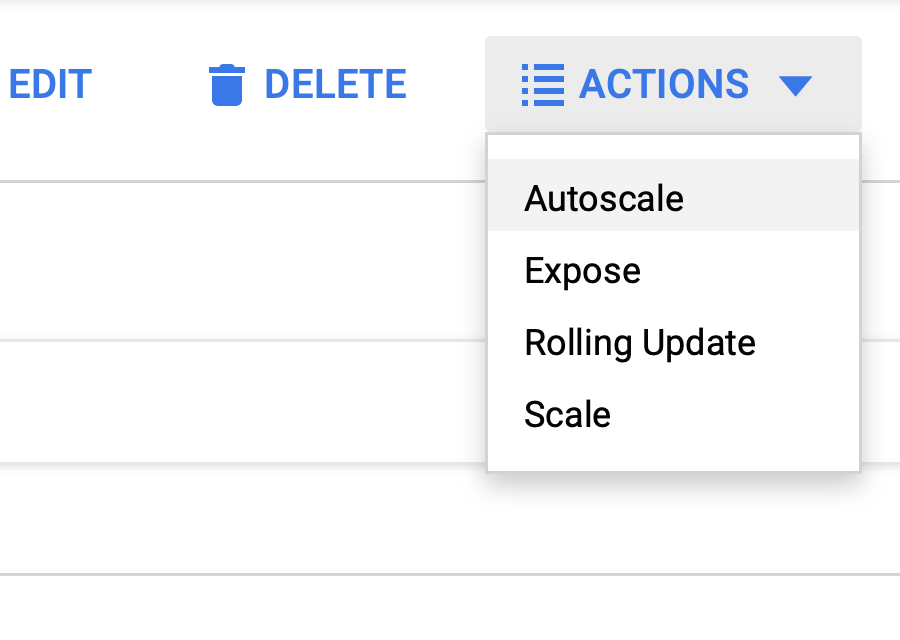
… If you're going to be using your cluster in production or doing heavier testing, you'll want to configure this.
Override the “health check” port and path
… You can skip this step if you won't be running gRPC!
The tricky thing about Ingress, which we'll need to expose our service to the internet, is that by default it will stop serving your application unless the main HTTP service responds with a successful response code (i.e. between 200 and 299, inclusive) on the “/” root path of your HTTP server. — By default, gRPC does not do this!
Luckily, there's a way to override it, but it's not obvious or straightforward. — You can force the health check to another port and/or path alongside your default server if you're planning on running gRPC or some service that does not respond on “/” with this addition to your workload's YAML.
On the Cloud Console page for your workload, click the “YAML” tab, and edit this in under the “spec” → “template” → “spec” → “containers” indentation:
        livenessProbe:
          httpGet:
            path: /_ah/health
            port: 8081
            scheme: HTTPS
        readinessProbe:
          httpGet:
            path: /_ah/health
            scheme: HTTPS
            port: 8081
        ports: # Replace the existing one for this...
        - containerPort: 8080
          protocol: TCP
        - containerPort: 8081
          protocol: TCP
… That's all there is to it. 👍🏻
You might not need this part, but if you'll be running an unmodified gRPC server at this time of writing, your health check will definitely otherwise fail without some other hack to the server software itself.
Exposing the service via Ingress and HTTP/2 + TLS
OK, hopefully final steps here.
… Since there are multiple cluster nodes/pools/pods involved, we'll need to create an Ingress resource, which will create a load balancer automatically that serves as a single client-facing resource. (NOTE: Each Google Load Balancer currently has an unavoidable base cost of around $18 USD/month at this time of writing, even only for very light or experimental usage.)
There are a few different ways to implement Let's Encrypt when running Kubernetes, but many of them require maintaining and configuring your own load balancer. — Doing this instead via Google's own offering is fairly smooth once it's up and running, though! 🤔
Create a “NodePort” for your Workload
First, apply the “manifest/nodeport.yaml” file from the repository to create a NodePort that our Ingress load balancer can point to:
kubectl apply -f manifest/nodeport.yaml… Note that in this YAML file, it has the same ports as defined in our “livenessProbe” and “readinessProbe” YAML addition to our workload that we set above. (These need to match what we've setup.) — If you skipped that step because you're not serving gRPC, tweak this file to only have the one port you're serving on before applying it.
If you'll be using Let's Encrypt, generate a throwaway, self-signed TLS certificate as a placeholder for Ingress
… If you aren't going to use Let's Encrypt, you can skip this step.
Since HTTP/2 enforces TLS, even if we're using Let's Encrypt at the Ingress level (instead of a certificate we've obtained ourselves from another certificate authority), this whole thing will break down without a TLS certificate of some kind in place from the beginning.
So, one solution to this is to just generate a new authority and certificate locally that lasts for 1,000 years and is for “localhost” or some other hostname never used in production:
mkdir tls

openssl genrsa -des3 -out tls/ca.key 2048
openssl req -x509 -new -nodes -key tls/ca.key -sha256 -days 365000 -out tls/ca.key.pem -subj "/CN=localhost"

openssl req -new -sha256 -nodes -out tls/ca.csr -newkey rsa:2048 -keyout tls/key.pem -subj "/CN=localhost"
openssl x509 -req -in tls/ca.csr -CA tls/ca.key.pem -CAkey tls/ca.key -CAcreateserial -out tls/crt.pem -days 365000 -sha256
After generating these files, convert them to Base64 encoding and then copy-paste the output into the “manifest/ingress-secret.yaml” file:
cat tls/crt.pem | base64
cat tls/key.pem | base64
… OK, that's all the Ingress needs to be created and be “valid,” even though we won't serve anything on its default “frontend configuration” if we're using Let's Encrypt.
Note that these instructions for OpenSSL are for the current version of macOS at this time of writing (10.14.1), so if you're on another platform or version, you might need to update or adjust these slightly to get the same output.
If not using Let's Encrypt, create a static IP address and modify the Ingress manifest file to use it
If you're using a certificate signed by another certificate authority (not Let's Encrypt), you'll want to create a static IP address for your Ingress beforehand using the “gcloud” command-line tool, since you'll be using the default auto-generated frontend configuration for your service in production: (Otherwise, an ephemeral IP address will be auto-assigned, and you could lose that address in the future for some unexpected reason.) ⚠️
gcloud compute addresses create --project=example-grpc --global example-grpc-ipv4… I included a commented out annotation line for assigning this in the “manifest/ingress.yaml” file, which you can uncomment and adjust based on the name given to the IP address. (above)
Finally, apply the secret and create the Ingress
Copy and paste the Base64-encoded certificate and key into the “manifest/ingress-secret.yaml” file of the repository if you haven't already, and apply this and the “manifest/ingress.yaml” files in that order:
kubectl apply -f manifest/ingress-secret.yaml
kubectl apply -f manifest/ingress.yaml
Cool, now you should see an Ingress creating under your “Load balancers” list on Cloud Console, and your service should begin serving soon… unless you still need Let's Encrypt for TLS! ✅
Configure Ingress for Let's Encrypt
If you're dying to use Let's Encrypt (instead of a manually-renewed certificate obtained from another certificate authority) and have followed the steps above so far to do so, you can add another “frontend configuration” to the Ingress load balancer for your cluster at this point.
… This additional frontend configuration will use the same health check and backend that should already be healthy! — But, a few things to keep in mind:
- You should not modify or remove the default “frontend configuration” or “backend configuration” that the redeployable “manifest/ingress.yaml” file created, but you should be OK by just adding another frontend configuration. (At this time of writing, reapplying that manifest file will recreate or adjust these default frontend and backend configurations without affecting the other that you've created, but will revert any changes you made to the original configurations manually if you did so.) 🛑
- It may eventually (later) become possible to use Let's Encrypt immediately when deploying Ingress using the manifest file instead of using the placeholder self-signed certificate, but it is not currently at this time of writing.
- The default ephemeral IP on the load balancer will still serve the backend using the self-signed certificate we created before, but this is redundant and would have to be explicitly trusted by clients, so it wouldn't be advertised or utilized in production and should just be ignored instead.
… Adding another “frontend configuration” without modifying anything existing is actually super straightforward via “Load balancers” on Cloud Console:
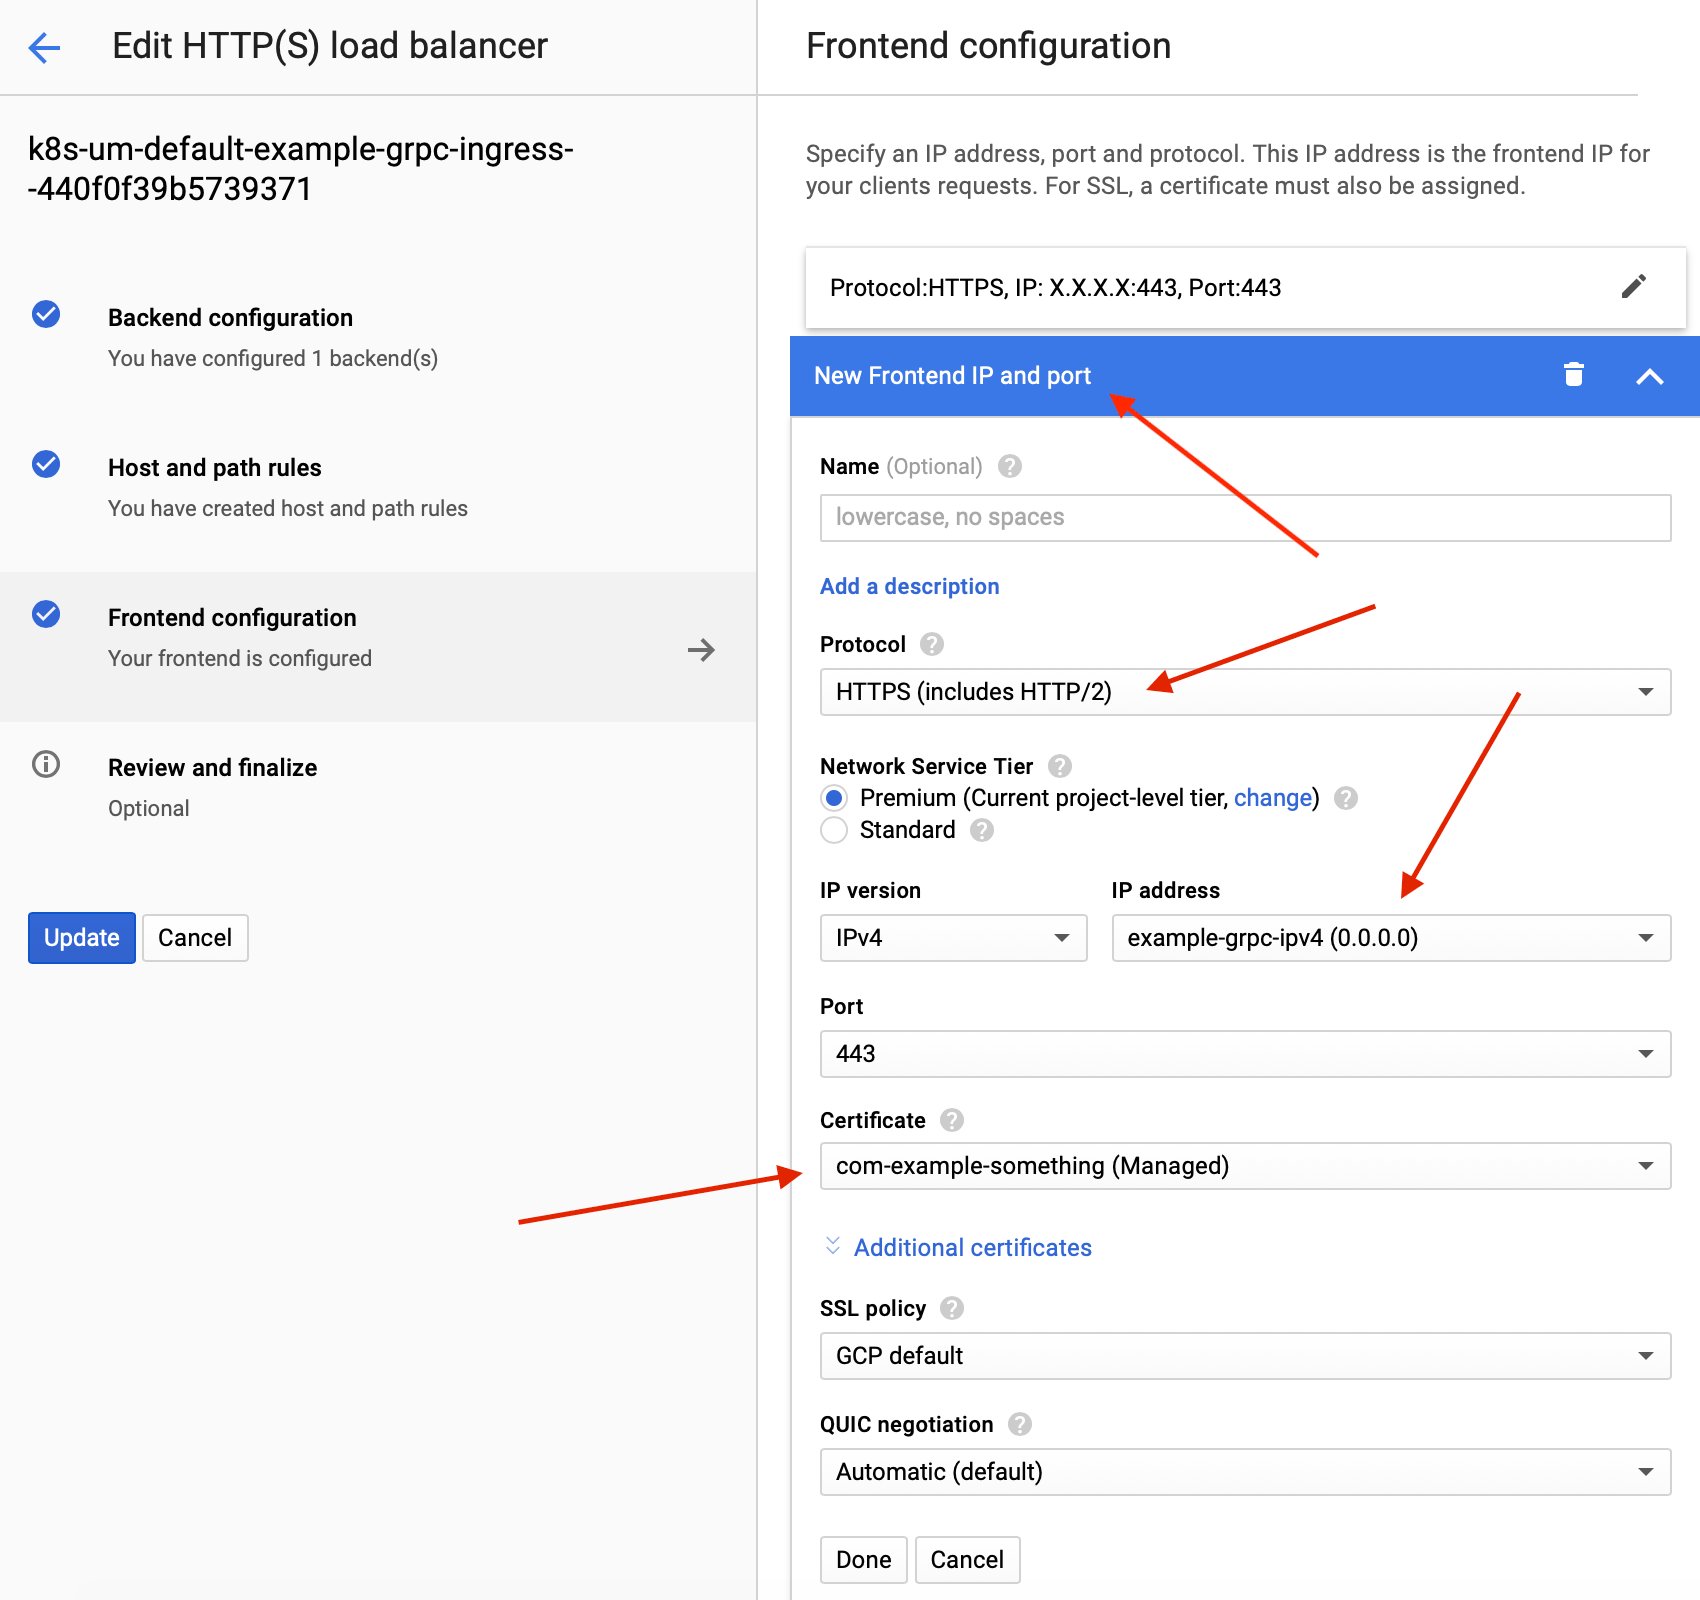
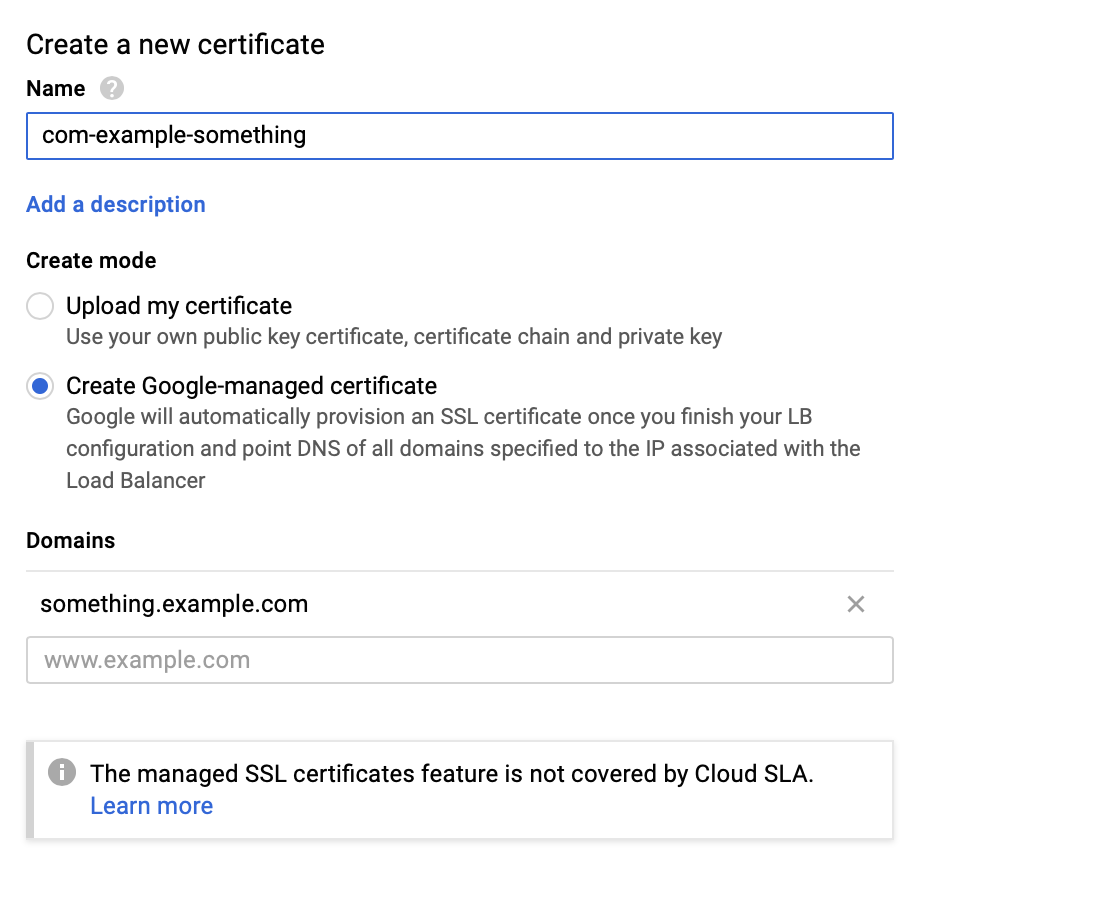
When assigning a certificate to the “frontend configuration” that you're creating, to use Let's Encrypt you can simply select to use a “Google-managed certificate” rather than uploading one manually:
… Cool! Once everything has updated, you should now be serving gRPC over TLS with Let's Encrypt on Kubernetes with a passing health check. 👍🏻